
Find Nodes with XPath
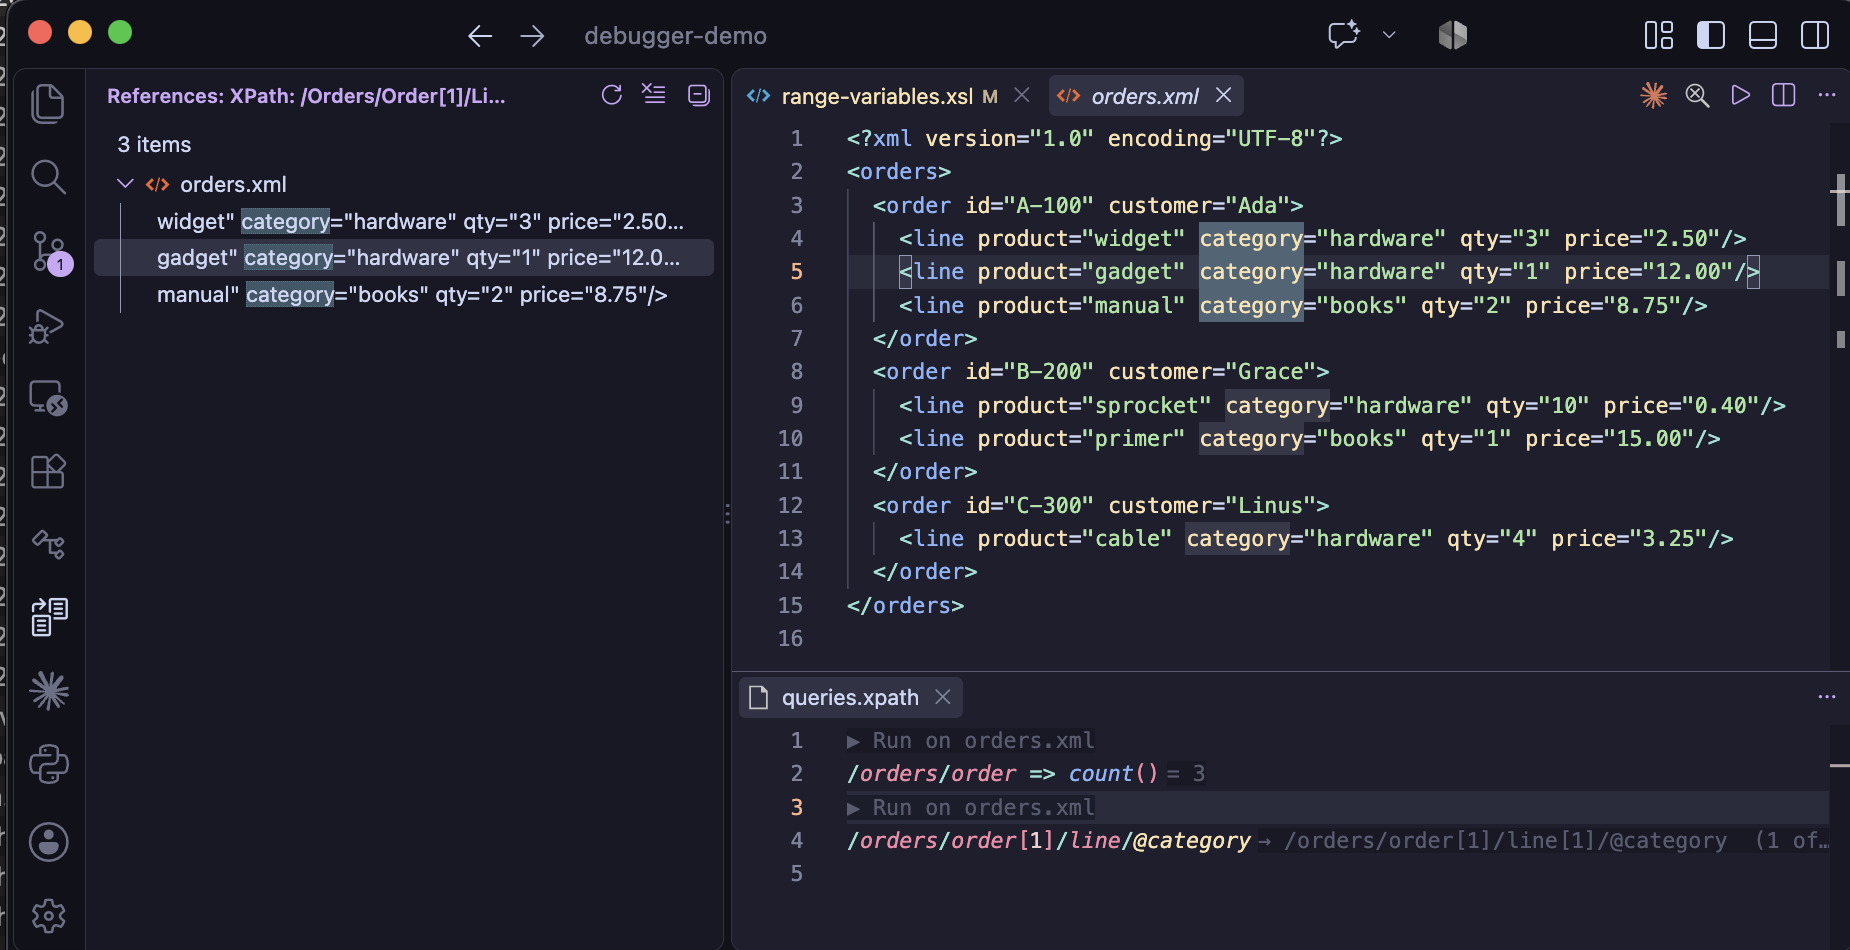
To find nodes in an XML file with XPath, write expressions in a query file, an XPath editor below the XML file, and run them one at a time. The nodes an expression finds are listed as VS Code lists references, to step through in the XML file. Other results, such as a count or a list of strings, are shown after the expression.
Opening the query file
In the editor of an XML file, click the search button in the editor's title bar, or run XML: Find Nodes with XPath... - from the Command Palette, the XML Selection submenu of the editor's context menu, or the XML: Select Element... quick pick (⇧⌘2 / Ctrl+Shift+2).
The query file, queries.xpath, opens in an editor group below the XML file, a quarter of its
height. A new query file starts with an expression for the XML file's root element, such as
/orders. There's one query file for each workspace, kept by VS Code, so your expressions are
there next time.
Writing expressions
The query file has several expressions, separated by blank lines. An expression can take several lines,
with no blank line within it, and can have comments, (: like this :).
/orders

//order[@status = 'late']/@id

count(//item)

//order
  [item = 'ink']
  /@id
As in any XPath file, expressions are highlighted and checked as you type, and auto-completion includes the names of the elements and attributes in the XML file. Each expression is checked on its own.
Namespaces
The namespaces declared on the XML file's root element can be used without declaring them:
- a name without a prefix matches an element in the root element's default namespace - so for
<orders xmlns="urn:orders">,//orderfinds itsorderelements - a prefix declared on the root element, e.g.
xmlns:x="urn:extra", can be used as it is://x:note
For another namespace - one first declared further down, or with a prefix of your choosing - start the
expression with a declare namespace line:
declare namespace svg = "http://www.w3.org/2000/svg";
//svg:rect
A declaration applies only to its own expression.
Inserting the location of a node
To start from a node in the XML file, put the cursor on it - on an element or an attribute - and press
⌥G / Alt+G
(XML: Add XPath Location to Queries). Its location, such as
/orders/order[2]/@id, is added to the end of the query file, with the cursor on it, ready to
run or change. If it's already in the query file, the cursor moves to it. With the cursor on no node, the
query file is just opened.
In the query file, at the start of an expression, the same location is offered by auto-completion - type
/, or press ⌃Space / Ctrl+Space.
It's the first suggestion, marked cursor in orders.xml. The XML file must be shown in an
editor.
Running an expression
Above each expression, on the blank line before it, is ▶ Run on orders.xml, naming the XML file it runs on. Click it to run the expression, or press ⌘Enter / Ctrl+Enter to run the expression at the cursor. The text in the XML file's editor is used, including any changes not yet saved.
If Saxon reports an error, such as a syntax error, it's shown in the Problems view, at the place in the expression where Saxon found it.
Results
After each expression run, its result is shown in brief, at the end of its last line:
→ /orders/order[1]/@id (1 of 3)- the location of the first node found, and how many there are= 3, or= ('pen', 'ink', 'pad')- values, written as XPath literals and cut short if they're long= () nothing found- an empty sequence
Click it to see the whole result in the XPath Query output panel, with each item on a
line of its own. A map, array or function is written on one line, e.g.
map{"a":[1,"two",true()]} or fn:count#1 - to see part of a large map, change
the expression to select it.
When the result has nodes, the XML file's editor shows the first, with the nodes listed beside it, as VS Code lists references. Click one to go to it, or press F4 / ⇧F4 to go to the next or previous node. The name of an element or attribute is selected, and for a text node, its text.
Switching between XML files
Expressions run on the XML file you were last in. Click into another XML file's editor, and ▶ Run names that file: run the same expressions on it, as you would search it with Find. The checks and auto-completion in the query file follow the switch, for the new file's names and namespaces.
The results shown after the expressions are those for the file they'd run on. Switch back to an earlier file to see its results again.
This is separate from the XML context file shown in the status bar for Quick Run and tasks: switching between XML files doesn't change it.
Limitations
- Each run starts Java, so it takes about a second.
- Results shown after the expressions aren't kept when VS Code is closed.