
Editing XML
XSLT developers benefit from a set of XML editing features that are also available for any XML file. These general purpose features are described here.
XML Elements
Rename Tag
As you edit the start tag name of an element, the corresponding end tag name is changed at the same time to keep the XML well-nested.
Self-Close Element
To convert an element with a start-tag and end-tag to a self-closed element: With the cursor immediately to the
left of the > at the end of the start-tag, type
/. Any element contents and the
end tag will be deleted automatically:
<d><para/>test</para</d>
--> <d><para/></d>
Rename all elements with selected name
Select the element tag name you want to rename by double-clicking it, then press (⇧⌘L). This selects all matching tag names so you're in a multi-cursor edit mode. As you edit the tag name you selected all matching tag names are edited also. When done, press Escape to exit multi-cursor edit.
Auto tag-close
Element tags are auto-closed when typing </ when an element is unclosed.
Note that this feature is only enabled when the VS Code user-setting Format on Type is set (indentation is fixed at the same time).
Auto-Completion
Outside of the auto-complete (IntelliSense) features for XSLT and XPath, a small set of snippets for general purpose XML elements is accessible from the auto-completion list:
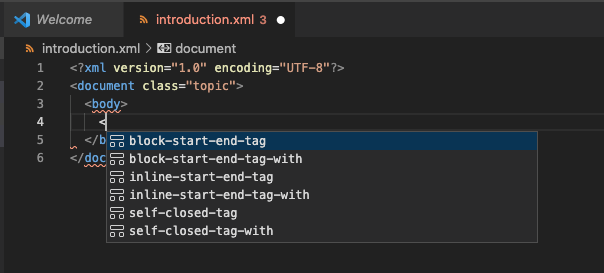
After a < within an element, the tag snippets insert an element with a placeholder for its name,
which is used for both the start and end tags:
block-start-end-tag- start and end tags on separate lines, with the cursor on the indented line between theminline-start-end-tag- start and end tags on the same line, with a placeholder for the text between themself-closed-tag- a self-closed element
Each has a -with variant, such as block-start-end-tag-with, that also inserts an attribute.
Before the root element of a file, the XML Root Element Snippet inserts an XML declaration and a root element
with an attribute and a child element.
With the cursor in the element start tag where you wish to add the attribute, press ⌃Space
and select attribute to insert the code snippet:
name="value"
Edit the name and then press Tab to edit the value.
Emmet
Emmet can be used to insert XML snippets using a shorthand notation. Emmet should be enabled in user settings. See the Settings section for an example.
Well-Formed XML Checks

As you edit an XML file, the syntax is checked for any well-formedness errors. Any problem tokens are highlighted with a squiggly underline in the editor. To see a description of the problem, hover over a highlighted token. To help navigate between problems, the Problems view (press ⇧⌘M to toggle) shows a list of XML syntax problems. Problems are also highlighted in the Outline View. Selecting a Problems view list item, or Outline View node will navigate you to the corresponding token in the XML editor.
Entities
An XML or XSLT file can declare entities in its DOCTYPE's internal subset, to use as references such as
&company;:
<!DOCTYPE xsl:stylesheet [
  <!ENTITY company "DeltaXignia Ltd">
]>
Each reference is checked: it must be one of the predefined entities - <,
>, &, " and ' - a
character reference such as  , or an entity the internal subset declares. When the
DOCTYPE names an external DTD, or the subset uses a parameter entity reference such as
%chars;, any entity name is allowed, as its declarations can't all be seen.
- Type
&to auto-complete an entity name: the declared entities, with their values, and the predefined entities - Hover over a reference to see its entity's value, or the file of an external entity - or, for a character reference, the character's code point, such as U+00A0
- Go to Definition (F12) on a reference goes to its
<!ENTITY>declaration
In the DOCTYPE, the names of declared entities are colored as references are, and quoted values as strings.
XML Formatting
When you have an XML file open, normal XML formatting features are available. With typical hand-edited XML, only the indentation is changed by the formatting. However, if no newline characters are found at the start of the XML file, it is assumed the contents are system generated and newline characters are added for elements that are not mixed content.
The formatter observes the normal rules for whitespace preservation in XML. So xml:space attributes affect
whether indentation is preserved. Whitespace in CDATA sections and 'significant' whitespace in content inferred
to be mixed content is also preserved.
XML attributes on newlines and multi-line attribute value are indented by the XML formatting provider to reflect the level of nesting.
The XML: Format XML with newlines inside mixed-content command, from the Command Palette (⇧⌘P), formats the whole file with a newline added before each start tag and end tag that doesn't already start a line, and indents the result - including inside mixed content, where whitespace is otherwise preserved.
Tab on an Empty Line
In an XML or XSLT file, pressing Tab on an empty or whitespace-only line, such as one you've clicked on, indents the line for its context, as if you had just pressed Enter, with the cursor at the end of the indentation. Elsewhere, or where the line is already indented that far, Tab works as normal. The key binding is for the Tab: Indent an Empty Line for Its Context command, and can be changed in the Keyboard Shortcuts editor.
XML Element Selection
The XSLT/XPath extension provides a set of commands for selecting an element. These commands can be invoked from the Command Palette (⇧⌘P), or from the XML Selection submenu of the editor's context menu (right-click), which also shows their keyboard shortcuts. From the keyboard, XML: Select Element... (⇧⌘2) shows the same commands in a quick pick. On Windows and Linux, the shortcuts use Ctrl+Shift instead of ⇧⌘, for example Ctrl+Shift+0.
- Select current element - ⇧⌘0 extend selection to include containing element's start/end tags
- Select parent element - ⇧⌘9 extend selection to include parent element's start/end tags
- Select first child element - ⇧⌘8 select the first child element's start/end tags
- Select following element - ⇧⌘7 select next sibling's start/end tags
- Select preceding element - ⇧⌘6 select previous sibling's start/end tags
The submenu and quick pick also have Find Nodes with XPath... and Add XPath Location to Queries (⌥G / Alt+G) - see Find Nodes with XPath.